Sunday, February 01, 2015

Reno@CCK Maisonette - Kitchen works

hello!!!
last week, i gave a brief introduction on the shoe cabinet and this week, the kitchen is almost ready! Top and bottom cabinets have been installed with blum hinges, drawer tracks and aventos system. The hood and hob have been installed, quartz countertop completed as well. Leaving the glass backsplash as the final item.

We have chosen a quick a light woody laminate for the bottom cabinets for the kitchen and the top is finished in white high gloss laminate that ties back into the white ceiling.

 above: BOSCH telescopic hood installed


 The corner top cabinet has been given a chamfered treatment.
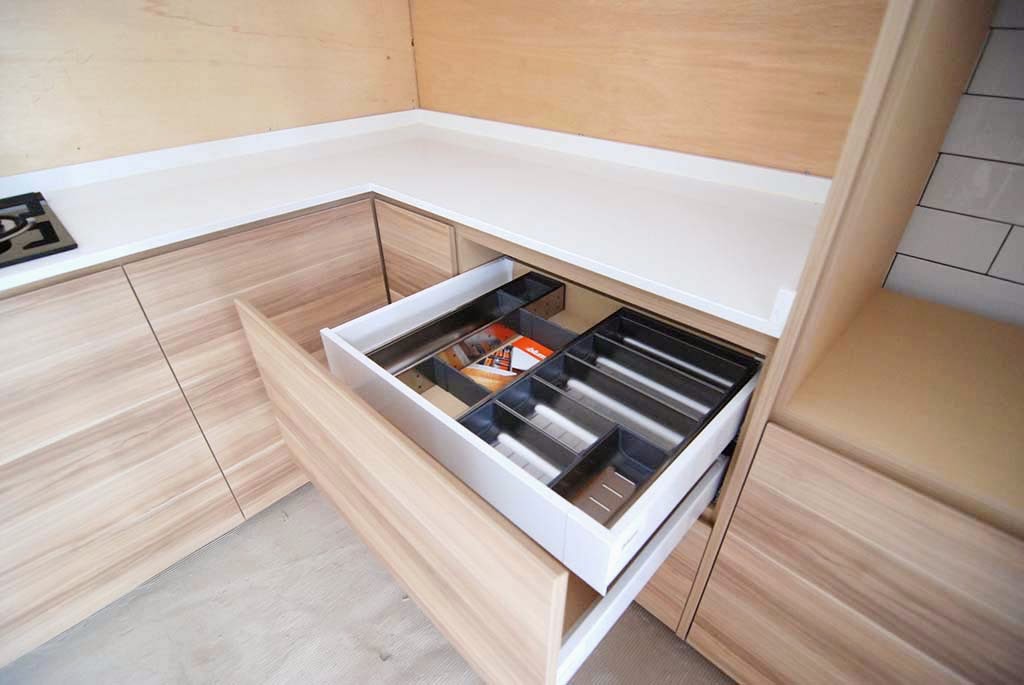
 hidden cutlery tray


 all soft closing system are using BLUM


Reno@CCK Maisonette - staircase, wardrobe and bedhead

Our CCK maisonette reno journey is coming to an end soon! The official moving in ceremony will be held this coming tuesday!!! For the living, we did a box up for all the wirings and a/c trunking. With this new box up all around the living and dining, the couple bought recessed downlights to light up the area.
view towards the entrance foyer - staircase on the left and shoe cabinet on the right. After the cleaning guys took out the window film, daylight is streaming in like floods of water! The whole area looks sprightly!
For the master wardrobe, we are using swing doors and here's a close up detail on the door handle which stretches from top to bottom.


 Laminate chosen for wardrobe is under the fabric series.
 here's the bedhead area where there's customised storage area under the windows.
 side cupboards on both sides of the bed
And a super long open shelf to put their mobiles and other knick knacks. The area at the bottom are deep storage spaces for cushions, extra blanket and the likes.


Retro looking parquet - herringbone style. Actually where I'm staying, my room is also done up this way - herringbone style. Must be in the same era.
2 quick photos on the restored black painted railings. I think after giving it a good paint job, the railing looks new and it will be such a waste to threw it away!
ritey.

stay tuned for the final photos!

xoxo
velle

Reno@CCK Maisonette - updates on the bathrooms

The lower bathroom is completely utilitarian, no frills except for a feature wall in mosaic. A special request from the couple.
 Here's a quick look at the blue mosaic wall in the tiny bathroom!
The full wall of mosaic!
 And using a PD which slides and swing inwards.
 above: master bathroom vanity

 top cabinet - loads of storage area here
 The shower area is cladded in wood tiles, refreshing and different.
Has a "resort" feel to the whole bathroom!
common bathroom upstairs - beige floor tiles and wood tiles for the shower area. 

The wood tiles here are slightly lighter in colour. haha..that's because the couple couldn't decided between the 2 wood tiles so ended choosing both, one for the common bath and the other for the master bathroom. So if you have more than 1 toilet, chances are you can choose more tiles for your new place if you can't make up your mind.

 common bath vanity area
here's how it looks with the lights turned on! though the bottom downlights are not installed yet.

Reno@CCK Maisonette - The SHOE cabinet


 beside the shoe cabinet is the guest cum study room. Very spacious, bright and airy.

 we hid the DB box in the shoe cabinet and a long vertical column of area left for umbrellas.
In this mega big shoe cabinet, I would think it's almost equivalent to a shoe closet already - we have 2 big drawers for socks, shoe polish and other related miscellaneous items, many many adjustable shelves, hidden DB and a dedicated space for long umbrellas.

Saturday, January 31, 2015

Reno@VistaSpring - Brickwall done!

This week, the brick wall is up!!! And we have been pushing our contractor to quickly get an appointment for the vinyl flooring to come in to do the flooring. But it's really close to the Lunar New Year, so it seems like the whole world is rushing to get their renos done before the CNY.
 close up on the brickwall after the grouting is completed.

All the loose wirings have been pulled in the house too, now waiting for the flooring before the carpentry can start next.
 Aircon trunking done too. The FCU will be installed later, so it wouldn't get dusty for a long time.


Aircon trunking in the master bathroom, no choice have to cross over here to get to the aircon ledge. Think I need to talk to the contractor how to box this thing up.
See the brown and yellow wall in the master bathroom? We are going to overlay the bathroom wall with the new feature wall tiles. That way, the whole bathroom wouldn't look too jarring with so many colours.
 me to Jules: ok darling...go and press the lift!
 and off he goes!!

catch up with me on our reno journey at CCK Maisonette and CCK2 Maisonette!

xoxo
velle

Thursday, January 29, 2015

DIY Reno or Not

often I get emails asking whether do I think home owners should do the reno themselves or hire an ID to do the job.

let me put it this way.

Either
you pay someone who does the job for you while you are earning more money or having a starbucks coffee, chillax with your colleagues or friends, if not spending time with your family or fulfilling your travel bucket list. You pay for the time that don't need your time. Get it?
or

you do your own homework, scroll down thousand and one websites to learn the ropes. In other words, to do your own reno, if you are not experienced, be prepared that your reno will take a longer time than required.  To do all these, you must have time and patience. End of the day, most probably you might have quite a good self satisfaction.

this is a short summary.

here comes the longer part: (you can skip it if you don't want to read)

you pay the ID to do the following things, more or less, things that you probably aren't good at
  1. design & space planning
  2. drawing up 2d drawings
  3. building up 3d drawings
  4. telling you whether your kitchen appliances fit or not
  5. what sizes of toilet bowl and sinks to buy
  6. giving you a quotation , reno budget
  7. project manage during the reno - thousand and one phonecalls to be made like to the contractor, the electrician, the tiler, the partition works guy, the plumber, the aircon guy, the carpenter etc etc
  8. tell you how many lights to buy, what kind of lights to buy, what size of lampshades to get
  9. tell you where you should put your powerpoints and how high
  10. decide how to run your electrical wirings, how best to conceal them
  11. what kind of tiles to buy, what sizes to choose, what goes with what and how to lay the tiles on site
  12. the type of laminates to choose, believe me, there are thousand and one laminates and so many different catalogues to choose from
  13. the colour PVC to choose, again selection can be quite tiring now
  14. the different types of countertop to go for
  15. choosing painting colours
  16. choosing electrical faceplates
  17. do things which you might take days to do, your ID most probably does it in less than half the time that is required.
these are just some basic items, every home reno is different so the list is not exhaustive.

ultimately the call is yours.


LinkWithin

Related Posts Plugin for WordPress, Blogger...